


This guide looks at set-up, configuration and live streaming from a Magewell Ultra Stream. It is intended as a useful reference for those using it to live stream from their church.
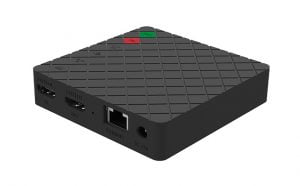
There are two versions of the Ultra Stream, an HDMI model and an SDI model. Both are exactly the same in terms of set-up and operation, differing only in their physical video connections (one using HDMI, the other SDI).
Ultra Stream settings are relatively straightforward to adjust and well laid out in the App / Browser interface, providing easy navigation. However, before you adjust any settings, please be aware that they cannot be saved externally or recalled. Please approach any changes with caution and with this in mind.
We recommend making sure the Firmware of your Ultra Stream is up-to-date before changing or adjusting any settings - more details below.
This information is provided as a guide only - for more details, or for anything not covered below, consult the Ultra Stream manual, or do feel free to call us. The easy-to-read Ultra Stream Manual can be found here for reference.
Connecting to the Ultra Stream
The Ultra Stream has an intuitive interface for set-up and monitoring. It can be accessed via the specific Magewell Ultra Stream App (iOS or Android) or via a Web Browser.
Connecting via the App or the Web Browser interface gives almost identical options and layout. However, for initial set-up, it can be simpler to use the web interface on a computer with access to your YouTube / Facebook account. This can allow for slightly speedier entry of details, or should you need to copy and paste information. The App is more practical for regular monitoring or remote control of the Ultra Stream.
Via App
Connect your iOS or Android device to the same (wireless) network as the Ultra Stream. The App will detect the Ultra Stream on the network and display it, along with a 'Settings' option.
Via Web Browser
Similarly to the App, connect your computer to the same (wired or wireless) network as the Ultra Stream. The Ultra Stream should appear in your 'Network' devices if you are using a Windows PC. Alternatively, you can use the iOS App to find the 'IP' address (under 'Network' in the App settings) and type this into the address bar of your browser.
Add a Streaming Server
 YouTube
Using the Web interface or App, go to 'Settings' > 'Streaming Server'. Choose 'Add Server' and select 'YouTube'. You will need to authenticate your Ultra Stream with your church's YouTube Account. Follow the on-screen instructions to do this (in the App, click 'Authentication Log In').
Once Authentication is complete, in the Ultra Stream YouTube Streaming Server settings, you will need to select which YouTube live stream you wish to 'Publish to'. This is selected via a drop-down menu. There are two options here:
Option 1: Very Simple Streaming / Less Flexible
From the 'Publish to' drop-down menu, select 'Add a new stream'.
- In the 'Title' field, give your regular live stream a name, e.g. 'St John's Live Stream'.
- Under the 'Privacy' drop-down menu, select 'Public'.
- Important - Then click the 'Save' button! (or 'Done' in the App). NB. Pressing the 'Test' button here just starts a short Live Stream, so only use it if you are happy to do that, but it is not necessary.
This is a very simple streaming option with no intervention required (besides pressing the green button on your Ultra Stream to begin and end your live stream). Your live stream will appear on the Church's YouTube Channel when you stream. This option is less flexible because it creates a new live stream 'on-the-fly' and consequently, you cannot obtain a direct URL link to the stream on YouTube beforehand.
Option 2: Simple Streaming / More Flexible
The second option streams directly to your 'reoccurring' YouTube stream settings. These can be found by logging in to your Church YouTube account and clicking 'Go live' (the camera icon at the top right of the web page). Similarly to Option 1, on this page you can set 'Title' and 'Privacy' settings.
The 'Title' you give on this YouTube page will appear in the 'Publish to' drop-down menu In the Ultra Stream YouTube Streaming Server settings. Once selected, remember to 'Save'!
This option requires no further adjustment on the Ultra Stream - you just press the green button to begin and end your live stream. It does, however, require you to go to your YouTube 'Go live' page after each stream to 'prime' it, ready for the next stream. Alternatively, renaming or editing your most recent stream in YouTube Studio will have the same effect.
Option 2 does give greater flexibility through the YouTube 'Go live' page as each live stream can be named specifically beforehand, and a direct link to the stream can be acquired (via the arrow icon top right of the web page). Changing the 'Privacy' option to 'Unlisted' can also be useful for events such as weddings or funerals, or any other event you wish only to be seen by those with the link.
YouTube via RTMP
Selecting RTMP as your 'Streaming Server' is essentially just the same as the Option 2 method above, but details are manually entered. If you are streaming to YouTube (or Facebook) and want to avoid the authentication rout,e then using RTMP is a very simple and stable option. You just need two bits of information. The name of the RTMP streaming server and the 'Stream Key' (this is like the password for your live stream).
Using the Web interface or App, go to 'Settings' > 'Streaming Server'. Choose 'Add Server' and select 'RTMP'.
- Give it a 'Name', e.g. 'YouTube Stream'.
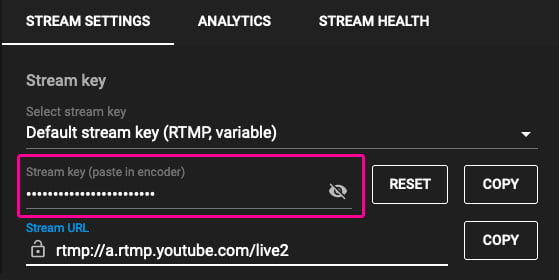
- Add the YouTube RTMP URL: rtmp://a.rtmp.youtube.com/live2 (remember to omit the 'rtmp://' from the beginning of the URL as it is already included as part of this field).

Find your YouTube Stream Key - Highlighted in pink.
Add your 'Stream Key' - This can be found on the 'Go live' page in your Church YouTube Account (as in Option 2 above). It is deliberately obscured but can be revealed by clicking the 'eye' icon next to it, or copied using the 'COPY' button.
- Leave 'Authentication' set to off, and the 'Network' option can be left as is.
- Important - Then click the 'Save' button! (or 'Done' in the App). NB. Pressing the 'Test' button here just starts a short Live Stream, so only use it if you are happy to do that, but it is not necessary.
NB. The YouTube RTMP URL is the same for everyone and doesn't change. The Stream Key will stay the same unless it is reset on YouTube. If reset, then it will also need to be changed in the Ultra Stream RTMP settings. The Stream Key is unique to you and should be treated carefully like any password.
Streaming to Facebook is almost exactly the same method as YouTube 'Option 1' above, with a similar authentication method. Similarly, it can also be configured manually via RTMP - note that Facebook's URL begins 'rtmps://...'
Encoding Parameters
These are the settings which dictate the quality and resolution of your stream and affect the 'bandwidth' (amount of data) it uses. For example, if you have a fast internet upload speed of 15 Mbps or more, you can stream a full 1080p HD stream without issue. If your upload speed is only around 3 Mbps, then you will need to reduce quality and resolution in order to stream reliably (less data = less bandwidth).
To adjust your Ultra Stream's encoding settings via the Web interface or App, go to 'Settings' > 'Encoding Parameters'.
The Ultra Stream creates two encoded streams - a 'Main Stream' and a 'Sub Stream'. Both can be configured within the Encoding Parameters page, along with what the Main or Sub Stream are used for. i.e. 'Record' (for recording), 'Live Stream' (for live streaming), and 'Preview' (the preview feed sent to the App / Web interface).
Generally, we suggest 'Record' is set to 'Main Stream'; 'Live Stream' is set to 'Main Stream'; and 'Preview' is set to 'Sub Stream'. This is unless your Internet upload speed is around 3 Mbps, in which case the lower settings of the Sub Stream could be better suited.
By default, the Main Stream settings are set to 1920x1080 pixels resolution, 30 FPS (frames per second) with a bit rate of 2 Mbps. This is full HD quality, and as long as the video input into the Ultra Stream is at the same resolution, then you should get a good quality stream. However, if you have a fast internet upload speed (10 Mbps or higher), increasing the bit rate in the 'Main Stream' settings to around 5 Mbps should help to increase overall image quality.
Keeping things up to date
Configuring the Ultra Stream to encode and stream to YouTube or Facebook should work reliably without much intervention. However, using free streaming services like YouTube and Facebook means there is little recourse should they change the way things work.
This is particularly the case if you have used the authentication route for set-up to either YouTube or Facebook. A change to the way they do things can mean the Ultra Stream encodes but cannot communicate to send the stream. Magewell usually react quickly to this and, along with any other updates and fixes, brings out Firmware Updates to solve these issues.
Firmware Update
You can simply check to see if your Ultra Stream's Firmware is up to date via the Web interface or App, just go to 'Settings' > 'Firmware Update'. If there is a new version of Firmware available, then this can be run and updated automatically here.
More questions?
If you have further questions about streaming your Church Services or the Magewell Ultra Stream please feel free to contact us.
Magewell Ultra Stream HDMI
£414.00 Inc VATMagewell Ultra Stream SDI
Original price was: £414.00.£375.00Current price is: £375.00. Inc VAT

